Practical Session 4
Example 1(Invoking Class
Builder )
Invoke Visual Basic.
Create New Project.
Click on the Menu Option Projectà
Add Class Module.
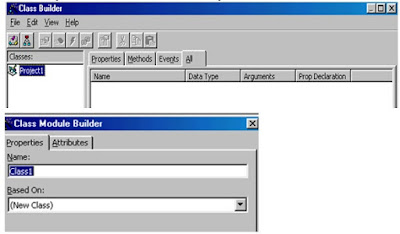
Select the option ‘VB Class
Builder’ and click Open Button. This
starts the Class Builder.
1) Creating A Class
a) Click on the menu option ‘File’ à NewàClass.
b) Specify My_Class in the Name Text Box
c) Click OK.
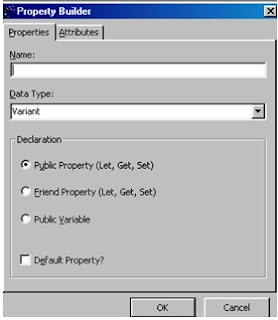
Click FileàNewàProperty
Specify X For Name Text Box.
Select Integer for Data Type.
Select Public Variable Option and
Click Ok.
Add following properties to
the class.
Name DataType Prop
Declaration
Clr_Fill Long Public Property.
Clr_Line Long
Public Property
Main_Frm Object
Variable
Radius Integer Variable
Y Integer Variable
3) Adding Methods to a
Class
Select Fileà
Newà
Method.
Specify Draw For Name Text Box.
Select None from list box ‘Return
Data Type’.
Click on the button ‘+’. This will displays the dialog box ‘Add
Argument’. Specify Line_Width For the
Name Text Box. Select Check Box ‘By
Val’.
Select ‘Integer’ from list box
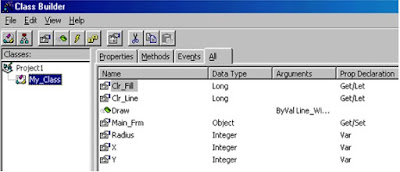
‘Data Type’. Click on OK button. This displays dialog box ‘Method Builder’. Click OK button. Class Builder Screen Will be look like as
Under:-
Click On Fileà
Update Project. Click On Fileà
Exit. This will automatically add the
class module to your project.
Coding Functionality for the Class:
1) Double click on My_Class in Project Explorer Window. The code is
attached to the properties created.
Following code is attached to its
individual Properties and methods:-
Public X As
Integer
Private
mvarClr_Fill As Long 'local copy
Private
mvarClr_Line As Long 'local copy
Private
mvarMain_Frm As Object 'local copy
Public Radius As
Integer
Public Y As
Integer
Public Property
Set Main_Frm(ByVal vData As Object)
Set mvarMain_Frm
= vData
End Property
Public Property
Get Main_Frm( ) As Object
Set Main_Frm =
mvarMain_Frm
End Property
Public Property
Let Clr_Line(ByVal vData As Long)
mvarClr_Line =
vData
End Property
Public Property
Get Clr_Line( ) As Long
Clr_Line =
mvarClr_Line
End Property
Public Property
Let Clr_Fill(ByVal vData As Long)
mvarClr_Fill =
vData
End Property
Public Property
Get Clr_Fill( ) As Long
Clr_Fill =
mvarClr_Fill
End Property
Add the following code to the
Draw Method
Public Sub Draw(ByVal Line_Width
As Integer)
Dim Frm_Act As Form
Set Frm_Act = Main_Frm
Frm_Act.DrawWidth = Line_Width
Frm_Act.FillColor = Clr_Fill
Frm_Act.FillStyle = vbFSSolid
Frm_Act.Circle (X, Y), Radius,
Clr_Line
End Sub
Click on Projectà
Componentsà
Microsoft Common Dialog Control 6.0 and click OK.
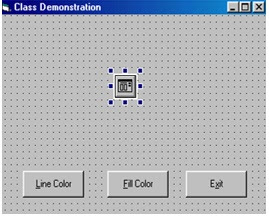
Design the form As follows
Object Property Settings
Command1 Name cmdLine
Caption &Line_Color
Command2 Name cmdFill
Caption &Fill_Color
Command3 Name cmdExit
Caption E&xit
CommonDialog1 Name cdlgCircle
Form Caption Class
Demonstration
Add following code in General
Declaration Section
Dim New_Circle as New My_Class
Add other codes as follows:
Private Sub cmdExit_Click( )
Unload Me
End Sub
Private Sub cmdFill_Click( )
cdlgCircle.ShowColor
New_Circle.Clr_Fill =
cdlgCircle.Color
cmdFill.Parent.Refresh
End Sub
Private Sub cmdLine_Click( )
cdlgCircle.ShowColor
New_Circle.Clr_Line =
cdlgCircle.Color
cmdLine.Parent.Refresh
End Sub
Private Sub Form_Load( )
Set New_Circle.Main_Frm = Me
New_Circle.X = 2500
New_Circle.Y = 1500
New_Circle.Radius = 950
New_Circle.Clr_Fill = vbBlue
New_Circle.Clr_Line = vbGreen
End Sub
Private Sub Form_Paint( )
New_Circle.Draw (2)
End Sub
Practical Session 5
Create New Project. Select ProjectàReferencesà
Microsoft Word 8.0 Object Library, Microsoft PowerPoint 8.0 Object Library,
Microsoft Excel 8.0 Object Library,
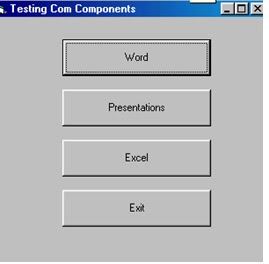
Design the User Interface as
Under:-
Form Caption Testing Com Components
Name frmTest
Command1 Caption &Word
Name cmdWord
Command2 Caption &PowerPoint
Name cmdPPT
Command3 Caption &Excel
Name cmdExcel
Command4 Caption E&xit
Name cmdExit
Add following Code in General
Declaration.
Dim mobj As Word.Application
Dim mobj1 As
PowerPoint.Application
Dim myobj2 As Excel.Application
Private Sub cmdWord_Click( )
Set mobj = New Word.Application
mobj.Visible = True
mobj.Documents.Add
End Sub
Private Sub cmdPPT_Click( )
Set mobj1 = New
PowerPoint.Application
mobj1.Visible = True
mobj1.Presentations.Add
End Sub
Private Sub cmdExit_Click( )
Unload Me
End Sub
Private Sub cmdExcel_Click( )
Set myobj2 = New Excel.Application
myobj2.Visible = True
myobj2.Workbooks.Add
End Sub
Create New Project
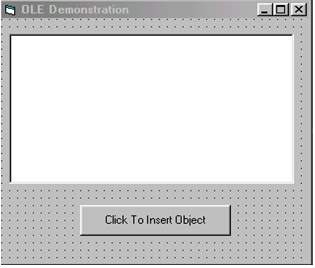
Design User Interface by placing
one OLE Control and one Command Button.
Form Caption OLE
Demonstration
Command1 Name cmdClick
Caption Click to Insert an Object
Caption Click to Insert an Object
Private Sub cmdClick_Click( )
OLE1.InsertObjDlg
End Sub
Private Sub Form_MouseDown(Button As Integer, Shift As
Integer, X As Single, Y As Single)
OLE1.Close
End Sub
Private Sub OLE1_DblClick( )
OLE1.InsertObjDlg
End Sub
Practical Session 6
Example (Creating an ActiveX
Control)
Invoke Visual Basic. àSelect Option ActiveX
Control. Click Open. Visual basic adds a ‘User Control’ Designer
to the project.
Designing the User Control
Place Shapes Control in ‘User
Control’.
Place Label control within
Shape1. Label1 must fit within Shape1.
Size User Control to fit Shape1.
Set following properties for
the controls.
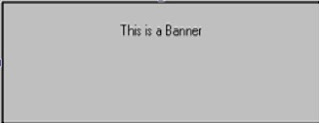
Label1 Alignment 2-Center
BackStyle 0-Transperant
Caption This is a Banner
Shape1 FillColor &H00C0C0C0&
FillStyle 0-Solid
UserControl Name MyActX
Project Name MyActX_Prj
Using
ActiveX Control Interface Wizard
Select Menu Add-Insà
Add-in Manager.
Select ‘VB6 ActiveX Ctrl
Interface Wizard’
In the Load Behavior Select Loaded/Unloaded. Click OK.
Now select Menu Add-In àActiveX
Control Interface Wizard. This invokes
the dialog box for ‘ActiveX Control Interface Wizard’.
Click Next > button.
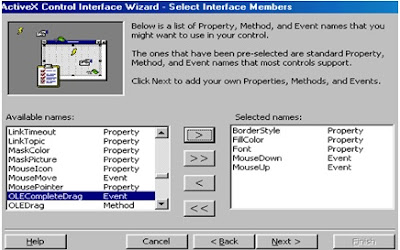
Select following options &
then Click >
button to add them in the list box Selected Items.
àBorder Style
àFillColor
àFont
àMouseDown
àMouseUp
The dialog will display as
above. Click Next> Button.
In the Next Dialog Box Click
‘New’.
Next Dialog Box for Add Custom Member will appear.
Enter Banner Text in the textbox
‘Name’.
Select option button
‘Property’. Click ‘OK’.
BannerText Property
BannerShape Property
TextColor Property
MoveWithin Event
Click on Next> Button.
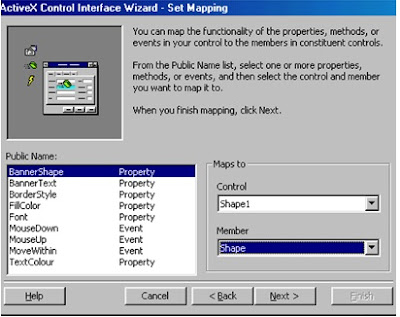
The Set Mapping Dialog Box will
appear as above. Where the events and properties are to be mapped. Map the properties and events as under.
Name Control Member
BannerShape Label1 Caption
BorderStyle Shape1 BorderStyle
FillColor Shape1 FillColor
Font Label1 Font
MouseDown Label1 MouseDown
MouseUp Label1 MouseUp
MoveWithin Label1 MouseMove
TextColour Label1 ForeColor
After mapping all items in the
list click Next> button. And in the
last Dialog Box click Finish. Save the
project.
Coding the functionality.
1) To change Border of
Shape Control the code is:-
Private Sub
UserControl_MouseDown(Button As Integer, Shift As Integer, X As Single, Y As
Single)
RaiseEvent MouseDown(Button,
Shift, X, Y)
Shape1.BorderStyle = 0
End Sub
2) MouseUp Event of
UserControl
Private Sub
UserControl_MouseUp(Button As Integer, Shift As Integer, X As Single, Y As
Single)
RaiseEvent MouseUp(Button, Shift,
X, Y)
Shape1.BorderStyle = 1
End Sub
3) Modify code of
‘MouseDown’ event of Label1
Private Sub
Label1_MouseDown(Button As Integer, Shift As Integer, X As Single, Y As Single)
RaiseEvent MouseDown(Button, Shift, X, Y)
Shape1.BorderStyle = 0
End Sub
4) Modify code of
‘MouseUp’ event of Label1
Private Sub Label1_MouseUp(Button
As Integer, Shift As Integer, X As Single, Y As Single)
RaiseEvent MouseUp(Button, Shift, X, Y)
Shape1.BorderStyle = 1
End Sub
Save the project.
Creating ActiveX Control File
Select Fileà
Make MyActX_Prj.OCX
Save the .OCX File with the same
nameà
Click OK.
Using the ActiveX in a Project
Click Fileà New ProjectàSelect
Standard EXEàClick
OK.

ßMy ActX.
Double click MyActX in the
ToolBox. And design the interface as
under:-
Dim orgClr As OLE_COLOR
In Form Load Event
Private Sub Form_Load( )
cboShape.AddItem "Rectangle", 0
cboShape.AddItem "Square", 1
cboShape.AddItem "Oval", 2
cboShape.AddItem "Circle", 3
cboShape.AddItem "Rounded Rectangle", 4
cboShape.AddItem "Rounded Square ",
5
org_clr = MyActX1.FillColor
txtText.Text = MyActX1.BannerText
End Sub
In the Form Mouse Move Event
Private Sub Form_MouseMove(Button
As Integer, Shift As Integer, X As Single, Y As Single)
MyActX1.FillColor = org_clr
End Sub
In the MyActx’s Move Within
Event
Private Sub
MyActX1_MoveWithin(Button As Integer, Shift As Integer, X As Single, Y As
Single)
MyActX1.FillColor = vbRed
End Sub
In the txtText’s Change Event
Private Sub txtText_Change( )
MyActX1.BannerText = txtText.Text
End Sub
In the Combo’s Click Event
Private Sub cboShape_Click( )
MyActX1.BannerShape = cboShape.ListIndex
End Sub
In the command Button cmd
txtColor ‘s Click Event.
Private Sub txtColor_Click( )
FirstLine:
CommonDialog1.ShowColor
MyActX1.TextColour =
CommonDialog1.Color
If (MyActX1.FillColor =
MyActX1.TextColour) Then
MsgBox "Text and back ground
Colours are same", vbExclamation, "Text will not be visible!!"
GoTo FirstLine
End If
End Sub
In the Command button
cmdBanClr’s Click Event
Private Sub cmdBanClr_Click( )
FirstLine:
CommonDialog1.ShowColor
MyActX1.FillColor =
CommonDialog1.Color
If (MyActX1.FillColor =
MyActX1.TextColour) Then
MsgBox " Text and back
ground colors are same", vbExclamation, "Text will not be
visible!!"
GoTo FirstLine
End If
org_clr = MyActX1.FillColor
End Sub
In the Command button
cmdExit’s Click Event
Private Sub cmdExit_Click( )
Unload Me
End Sub
Practical Session 7
Invoke Visual Basic.
Select DHTML Application.
Click on ‘+’ sign near to Folder Designer in the
project explorer window.
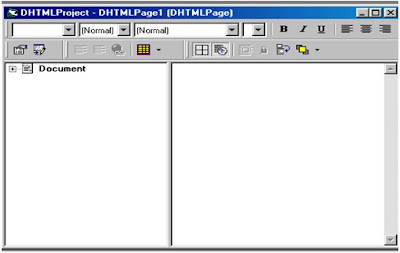
Double click on DHTML Page1. Maximize the DHTML Page. The page will be as:-
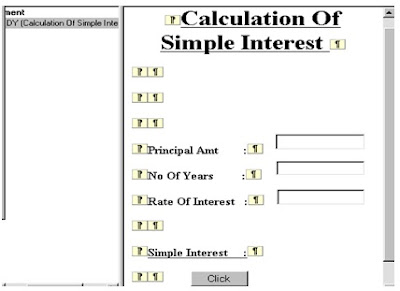
Design the interface as under:-
Object Properties Settings
Textfield1 Id Principal
Value
Textfield2 Id Years
Value
Textfield3 Id Rate
Value
Button1 Id Click
Value Click
Click on the text Simple
Interest and set its property ID to SimpleInterest.
In the Click Event of Button
Click.
Private Function Click_onclick( )
As Boolean
Dim SimpInt As Double
SimpInt = (Principal.Value *
Years.Value * Rate.Value) / 100
SimpleInterest.innerText =
"The Simple Interest is : " & SimpInt
End Function
After Executing the program the
output will be displayed on the internet explorer.
Practical Session 8
1 Dialog
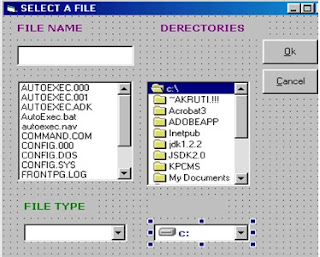
Box Creation with Drive List, DirList and FileList Controls.
Design the Form as indicated by
including following:-
Place four Label Controls one
Text Box, One DriveList Control, One FileList control, One DirList Control and two command Buttons.
Coding the Functionality
In the cmdCancl buttons Click
Event
Private Sub cmdCancel_Click( )
End
End Sub
In the cmdOk buttons Click
Event
Private Sub cmdOk_Click( )
If Text1.Text = "" Then
MsgBox "No file was
Selected"
Else
MsgBox "Selected file is
" + Text1.Text
End If
End Sub
In the Combo1’s Click Event
Private Sub Combo1_Click( )
Select Case Combo1.ListIndex
Case 0
File1.Pattern = "*.*"
Case 1
File1.Pattern = "*.doc"
Case 2
File1.Pattern = "*.txt"
Case 3
File1.Pattern = "*.xls"
End Select
End Sub
In the Dir1’s Change Event
Private Sub Dir1_Change( )
File1.Path = Dir1.Path
Label4.Caption = Dir1.Path
End Sub
In the Drive1’s Change Event
Private Sub Drive1_Change( )
On Error GoTo errortrap
Dir1.Path = Drive1.Drive
Exit Sub
errortrap:
MsgBox "Drive Error",
vbExclamation, "Error"
Drive1.Drive = Dir1.Path
Exit Sub
End Sub
In the File1’s Click Event
Private Sub File1_Click( )
Text1.Text = File1.FileName
End Sub
Private Sub Form_Load( )
Combo1.AddItem "All
Files(*.*)"
Combo1.AddItem "Doc
Files(*.doc)"
Combo1.AddItem "Text
Files(*.txt)"
Combo1.AddItem "All
Files(*.xls)"
Combo1.ListIndex = 0
Label4.Caption = Dir1.Path
In the General Declaration
Dim Age As Integer
Dim Category As String
In the CmdExit buttons Click
Event.
Private Sub cmdExit_Click( )
Unload Me
End Sub
In the Text2’s Click Event.
Private Sub Text2_Click( )
Age = Text1.Text
Text2.Text = Category
If Age = 5 Then
Category = "5 Years
Old"
ElseIf Age >= 13 And Age <=
19 Then
Category = "Teenager"
ElseIf (Age >= 20 And Age
<= 35) Or Age = 50 Or (Age >= 60 And Age <= 65) Then
Category = "Special
Adult"
ElseIf Age > 65 Then
Category = "Senior
citizen"
Else
Category = "Every One
Else"
End If
End Sub
In the Text2’s GotFocus Event.
Private Sub Text2_GotFocus( )
MsgBox "Click Second Text
Box"
End Sub
3 Changing the Signal
Create Three Bitmap Files For Red, Green and Yellow
Signals. Design the interface by placing
following controls on the form.
Controls Properties Settings
Image1 Name ImgRed
Visible False
Image2 Name ImgYellow
Visible False
Image3 Name ImgGreen
Visible True
Command1 Name CmdChange
Caption &Change
Command2 Name cmdClose
Caption E&xit
In the cmdChange’s Click Event
ChangeSignal
End Sub
In the cmdClose’s Click Event
Private Sub cmdClose_Click( )
Unload Me
End Sub
Write following function for
changing the signal.
Sub ChangeSignal( )
If imgGreen.Visible = True Then
imgGreen.Visible = False
imgYellow.Visible = True
imgYellow.Visible = False
imgRed.Visible = True
Else
imgRed.Visible = False
imgGreen.Visible = True
End If
End Sub
In the ImgGreen’s Click Event
Private Sub imgGreen_Click( )
ChangeSignal
End Sub
In the ImgRed’s Click Event
Private Sub imgRed_Click( )
ChangeSignal
End Sub
In the ImgYellow’s Click Event
Private Sub imgYellow_Click( )
ChangeSignal
End Sub
 Design the Interface as Follows by placing three
Horizontal Scroll Bars one Text Box three Label Controls and a Command Button
as Under.
In the cmdClose’s Click Event
Private Sub cmdClose_Click( )
Unload Me
End Sub
A function doColor
Sub doColor( )
txtColor.BackColor = RGB(hsbRed.Value, hsbGreen.Value,
hsbBlue.Value)
End Sub
In the Scrollbar hsbBlue’s
Change Event
Private Sub hsbBlue_Change( )
HsbBlue_Scroll
End Sub
In the Scrollbar hsbBlue’s
Click Event
Sub HsbBlue_Scroll( )
doColor
End Sub
In the Scrollbar hsbGreen’s
Change Event
Private Sub hsbGreen_Change( )
HsbGreen_Scroll
End Sub
In the Scrollbar hsbRed’s
Change Event
Private Sub hsbRed_Change( )
HsbRed_Scroll
End Sub
In the Scrollbar hsbRed’s
Click Event
Sub HsbRed_Scroll( )
doColor
End Sub
In the Scrollbar hsbGreen’s
Change Event
Sub HsbGreen_Scroll( )
doColor
End Sub
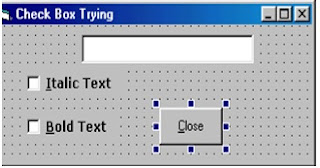
In the Check Box chkBold’s
Click Event.
Sub chkBold_Click( )
If chkBold.Value = 1 Then
txtDisp.FontBold = True
Else
txtDisp.FontBold = False
End If
End Sub
In the Check Box chkItalic’s
Click Event
Sub chkItalic_Click( )
If chkItalic.Value = 1 Then
txtDisp.FontItalic = True
Else
txtDisp.FontItalic = False
End If
End Sub
In the Command Button
cmdClose’s Click Event
Private Sub cmdClose_Click( )
Unload Me
End Sub
Top
